I know it has been a while, but the Calla restoration has been making slow progress, waiting for parts etc. I wanted to keep the 2 beautiful spun aluminium headlights, but I didn't want to be encumbered by the tyre driven dynamo, as I wanted to use Grand Bois Hetres, which are in my opinion the best 650B tyres...in the world! They are hand made foldable tyres, light and flexible as a racing tyre but in a 42mm width that gives a fast and comfy ride on any surface from smooth to gravel. You can find them here on the site if you want to experience the ultimate in 650B.
There is no way a tyre with sidewalls this light will drive a dynamo

So the search was on for a dynamo that wouldn't look out of place on the Calla. And

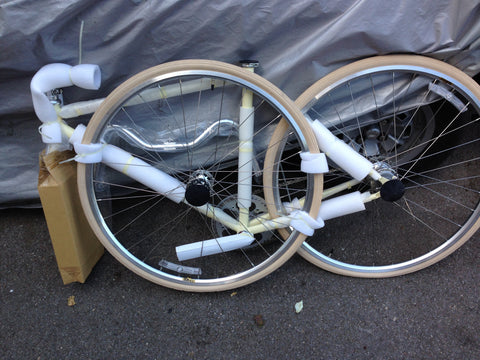
here it is the SP8. Tiny and only 350 Grammes. Top performing with maximum output and minimum drag. But will it drive 2 headlamps and a tail light. Well yes easily with LED replacement bulbs from Reflectalite. Dazzling bright at slow walking pace. So the front wheel was built with the dynamo and Grand Bois 650B rims and the rear with a SunXCD large flange hub. Darron at Sven Cycles widened the rear dropouts from 126mm to 130mm OLN before painting, so I could fit modern hubs. Here are the wheels :


Note the 10 speed cassette on the rear. I won't be walking up many hills! The rear derailleur will be a SunXCD, but the front will be the original "stick shift" with integrated chainguard. Works wonderfully well so why change it?

Under the polythene protection are Velo Orange Snakeskin Alloy mudguards. Darron was kind enough to use his panel beating expertise on the original 'guards but they looked wrong agains the new paintwork, so the guards and all the original parts we don't use will be stored in a box and given to the next owner so he can return it to original spec. if he wants to. The original racks have been powder coated black for durability.
The original leather saddle has seen better days and after a previous experience spending many hours restoring a re-rivetting a Brooks leather saddle only to have it tear in half on the 2nd ride, I decided on a a new Velo Orange which looks pretty much identical to the original. 
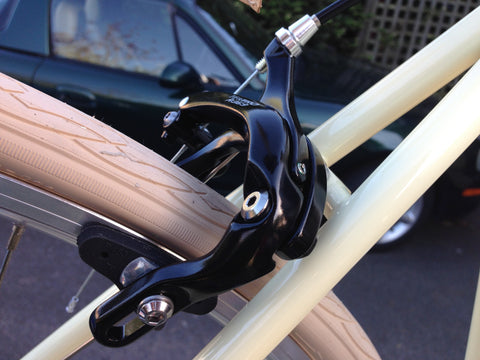
A new seat post was needed because the original is far too short for me. I love MAFAC cantilever brakes they are on all my tandems (I know). But the originals are the "shorties" and for maximum stopping power under heavy loads, it is preferable to fit the tandem version which has longer arms. I do have a quite a few of those , but we had them remanufactured recently in stainless steel to satisfy demand. Note the difference in leverage:


I am still undecided about the levers for these brakes. I spent ages polishing the original and elegant Mafac Guidonnet levers, but on the test ride I found they didnt come easiliy to hand and when I was riding my Polyvalent this weekend I noticed that i was ridng a lot with my hands on the hoods. I would like to keep the levers, so I am going to try and cable them up as "cross tops". I have some period original MAFAC drop-bar levers which I can fit with Rustines gum rubber hoods.

I spent a happy hour polishing the stem and Randonneur handlebars, as well as the levers. One thing is for sure, the horrible black plastic handlebar sleeves will be replaced with V.O. brown leather sew-on covers! They were so horrid, I temporarily covered them with cloth tape.

So a good bit of progress has been made" just the lighting to fit and wire up. The transmission to be fitted and the brakes to be cabled up. More soon...
Jobs for Spring Posted on 23 Feb 12:58 , 0 comments
We tend to gauge the turning of the seasons by what our customers are buying. This week there has been something of a run on brake cables and levers, so we are guessing that people are pulling their bikes out of hibernation and finding that the brakes are sticky.
Brake cables aren't expensive and with modern stainless steel inner cables and outers with a low friction lining, this kind of problem could be a thing of the past. The Velo Orange kits in 7 different colours are a low cost and effective solution and the braided metallic kits give a very classy look.


Indifferent gear shifting is usually cause by sticky cables, especially the exposed part that runs under the bottom bracket. The Velo Orange kits are available to match the brake cables. You can also find the various bits of hardware you need, like cable stops and cable clips in the Velo Duo Store. While you are at it clean your rims and check the brake pads.
Just because modern hubs are "sealed" it doesn't mean that moisture can't get in, especially if you have been out in wet winter conditions and put your bike away wet. Stripping and regreasing the hub bearings and the freehub is well worth the short time it takes. Old style cup and cone bearings can be stripped, cleaned and regreased to be as good as new, provided they are not pitted and worn out. Modern cartridge bearings can be regreased or replaced as necessary.
Please check your chain! A worn chain can quickly write off your chain rings and cassette sprockets. A yearly change is worth the investment. Otherwise check the length between 12 links with a steel rule: it should be 12'' if its has stretched by more than 1/8" replace it immediately. If within limits, clean and oil it. Leave it overnight for the oil to soak in and wipe the excess off in the morning to protect your clothes. If there is any sign of "hooked" teeth on your chain rings or rear sprockets. They will need to be replaced along with the chain. The number of people who bring their bikes in for "adjustment" with "simple" skipping and slipping of the transmission, that results in a bill of over £100 for replacement of the whole drive train, doesn't really surprise us any more. Regular checking of the chain can avoid this expense.
Check your tyres and tubes. If the tyres have gone down over the winter, probably time for new tubes. Get a decent pump too. The full size Zefal HPX are the best you can get. The mini pumps are strictly for emergencies.
Check your bottom bracket for excess "slop". If you need to replace it the Velo Orange Grand Cru bottom brackets are top quality and well priced.
Handlebar tape and grips are worth a spring refresh too and can also make a big difference to the feel and look of the bike.
Get your bike prepared and you can look forward to trouble free cycling this spring
Mike
The new (Mk4) Polyvalent for Disc Brakes, is now available. This first batch is now selling fast, with some sizes/colours already sold out. Available in Lilac or Green, the Lilac has been the most popular. Order now to be sure of getting one this year, as the next batch will not be here until 2019!
Polyvalent seems a curious name for a bike, especially to those with a scientific education, but in French it means "Multipurpose". As you may know, Velo Orange was originally inspired by classic French bicycles and the Polyvalent is the most French of their frames.
In the UK since before the 2nd World War, bicycle development has followed 2 main tracks. The classic rod-braked heavyweight roadster, as typified by the Raleigh Superbe and the lightweight "racer". Since the war, until the introduction of the mountain bike in the late eighties, the only other mainstream bike was the "Tourist Model": the typical medium weight, hub geared, cable-braked machine used for decades for riding to school, work or shopping with the occasional day ride into the countryside.
These tourist models, despite the name, were suitable for pretty much any use, except for cycle touring! Serious UK cycle tourists typically used "racers" with sturdier tyres and a large saddlebag.
In France however, cycle development followed a different path. "Constructeurs" were building specially designed machines aimed at cycle tourists and randonneurs. These were somewhat different to those available in the UK and USA and now have a great following in those countries. These French "hikers" had 650B wheels and 42mm tyres and importantly were designed to carry weight at the front. I remember back in the 70's when I first got interested in cycle touring and started reading up on the subject, it was mentioned in the literature that "the continentals" preferred to have front mounted panniers. This seemed crazy to me as my experience of bikes with heavy weights at the front was that they were most ungainly. The only exception was "trade bikes" and their large carriers were mounted firmly to the frame, rather than the forks. A the time I just thought "crazy Frenchmen" and fitted a rear rack and panniers. However I should have thought "clever Frenchmen".
The difference of course was the geometry of the frames and design of the forks was different and these "low trail" frames were optimised for carrying weight at the front. So, back to the Polyvalent: Velo Orange spent much development time on this frame ensuring that it is suitable for carrying weight at the front as well as the rear. It has "low trail" geometry and is for 650B wheels and cantilever brakes.
I built my Polyvalent in 2014 and it is truly the most versatile bike I have ridden. I built it specially for touring and have since used it on 3 tours, however it gets used for everything: club runs, day rides, shopping trips and my stable of half a dozen other bikes don't get much use now.

If you If you only have room for one bike in your life, the Polyvalent is it. View more builds here
https://www.flickr.com/photos/veloorange/sets/72157650889371601/
Christmas shut down and holidays did slow things down a little, but I got a call from Darron at Sven Cycles on Friday to say that the Calla was painted and would be ready for collection. on Monday (1st Feb). He sent a sneak preview, which looks fabulous!

The rear end has been widened to 130mm to give flexibility with transmission options. The build will start this week. Decisions to be made!
Probably the simplest part of a bike is the handlebars. No moving parts. Essentially just a tube. However they cause a large amount of confusion! There are so many "standards" and measurements. Here are some definitions (Thanks to Velo Orange).
- Stem Clamp diameter - The measurement outside to outside of the area that clamps to the stem.
- 26.0mm - standard road handlebars
- 25.4mm - standard city, upright, and MTB bars
- 31.8mm some more recent road and MTB bars particularly carbon fibre ones.
- Internal diameter - This is what you need to know if you are fitting inverse brake levers such as Dia Compe and Tektro. Generally a stem clamp diameter of 22.2mm corresponds to an internal diameter of approx 16mm and 23.8mm corresponds to approx 18mm. This can very slightly due to different manufacturers using slightly different gauges of tubing. If you have Steel bars, you will need to check as, as steel tubing usually has thinner walls.
- Brake Lever Clamp diameter - The measurement outside to outside of the bar where your brake levers and shifters clamp.
- Width - Measurement from center to center of the ends of the handlebar.
- Rise/Drop - Measurement from center of stem clamp to the center of the start of the grip area.
- Sweep - Measurement from center of stem clamp to bar end.
- Grip Length - Measurement of straight area of grip from end to end.

Unless you ask us to build your new bike and you come and collect it, your bike will be delivered partly disassembled in a box. The Orlandi is easy to assemble with simple tools that you will have in your garage.
If you do not feel confident to assemble the bike, ask your local bike shop to do it for you.
You are recommended to get the bike safety checked by a competent cycle mechanic before riding it.
Tools
You will need:
A 15mm open ended spanner
Allen keys
Small screwdriver
Tyre pump
Cable cutters.
Unpacking
Before unpacking, check you have received the bike you ordered.

Open the box! You will be relieved to find that it is mostly ready assembled:

Remove all packaging, padding and cable ties before working on the bike. Turn the stem /forks so they extend forward. One box contains the saddle and the other the brakes, pedals and other fittings
-
Wheels
- The rear wheel is already installed and the chain tensioned. Just check that the wheel nuts are tight before riding.
- Install the front wheel and secure the wheel nuts with a 15mm spanner
- Inflate the tyres to the correct pressure indicated on the tyres.
-
Handlebars: Insert the handlebars into the stem, being very careful not to scratch them and tighten the securing bolt on the stem. They can be installed either way up, depending on the riding position you prefer.

-
Brake Levers: Install the brake levers into the ends of the handlebars. Note: The levers are installed with the “Tektro RX 4.1” logo visible from the outside of the bike. Tighten the expander bolts securely.

-
Brake Calipers: Note the front and rear brake calipers have different length bolts. The longer bolt is for the front.
-
Install the front brake caliper from the front of the forks, threading the bolt through the hole in the fork crown from the front and securing the nut at the rear of the crown with the allen key.

-
-
Install the rear brake caliper from the rear through the hole in the rear of the brake bridge. Secure the nut using the allen key. Do not overtighten the nut.
-
Brake Cables:
-
Front Brake: Insert the nipple of the inner cable in the lever and lead the brake cable to the front caliper. Thread the inner cable through the adjuster and through the clamp on the caliper.
-
Adjust the brake blocks so they contact the wheel rims squarely. Ensure the brake pads do not touch the tyre! Grasp the calipers in one hand and squeeze the pads together so they nearly touch the rim and tighten the cable clamp.
-
Adjust the brake pads until the clear the rims by a few mm. Make sure the bolts securing the brake pads and cable clamp are tight.
-
Cut the inner cable to length and install and crimp the cable end cover
There are many videos on YouTube explaining how to adjust your brakes correctly. For more information visit http://www.sheldonbrown.com/rim-brakes.html#shoeadj
-
Rear Brake:
-
Install the cable in the lever as described above for the front brake. Route the cable over the top of the top tube (crossbar) and secure with the 25.4mm Dia Compe Cable clips supplied. You will need a small screwdriver to do this.
-
Measure and mark the required length of the brake cable
-
Withdraw the inner half way and cut the outer to length

-
Install the inner cable and adjust the brake pads and cable as described above.
-
Cut the inner cable to length and install and crimp the cable end cover.
-
Taping the handlebars. For the best look and performance run the brake cables under the bar tape until just before the bars start to bend. Please follow the detailed instructions here: http://www.sheldonbrown.com/handlebar-tape.html

-
Installing the saddle and seat post.
-
Seat Post: Loosen of the seat tube clamp and insert the seat post to the “Minimum” mark and tighten the seat clamp. IF YOU REQUIRE THE SADDLE HIGHER THAN THIS YOU WILL NEED TO BUY A LONGER SET POST. It is advisable to grease the seat post with Vaseline or grease before installing to prevent it seizing to the frame in the distant future!

-
Attach the saddle to the seat post and adjust as required. See http://www.sheldonbrown.com/saddles.html


-
Pedals: Note the left and right pedals are different. They are marked L & R
-
Take the Right Hand pedal (marked R) and carefully screw it hand-tight only into the crank arm. Secure with a 15mm spanner.
-
Take the Left Hand pedal (marked L) and screw it ANTI-CLOCKWISE into the crank arm. Secure with 15mm spanner.
-
Accessories. Install bell and reflectors as required by law.

-
Safety Check. Check the brakes are working properly before riding the bike and that the handlebars and stem, saddle and pedals are secure.
Enjoy your Orlandi!!


Possibly named after a famous climb in Tuscany or maybe the Calla Lilly. Calla was a cycle manufacturer from Alsace just on the French side of the Franco-German border. Not a large factory, nor a "Constructeur", but this little Randonneuse is loaded with charming details from the the early post 2nd World war era. Looking through old photos, it is entirely typical of an old French tourer. Custom Front and rear carriers in the same paint as the frame; a large bottle dynamo driving 2 beautiful polished alloy headlights and a tail light integrated into the aluminium mudguard. The Velo Orange parts we sell, seem to be faithful copies of the mudguards and carriers fitted to the Calla. It came to me in part exchange for a new bike and was alleged to have been bought from the original owner, having not been ridden for decades. Further research indicate that it might have been "flipped" a couple of times, but apart from new tyres, its originality is not in doubt.
Calla's condition is remarkable. There is no rust on the frame and even the Rigida Chrolux rims are only slightly pitted and carry the original stickers. I haven't stripped the bearings yet, but my instinct tells me it has not covered too many miles in its 65 years of life.

Despite the originality of the paintwork, there is not much of it left, with nearly every square cm having a chip or scratch. The paint that is left isn't too good either, so despite encouragement from friends on both sides of the channel to keep her "in her juices", I have decided to get a top quality respray from Darron at Sven Cycles in Weymouth Dorset (UK). My friend Andrew at Seventy2 Design is recreating the decals for me from photos. Current thoughts are the same metallic midnight blue and double box lining in silver and white, but to skip the sky blue head lugs, which look like they were hand painted afterwards anyway.

I want this bike to be a usable Randonneur too, so for me it will need a larger range of usable lower gears. But I do want to keep the original "look", so it will have an Alfine 8 hybrid drive - with a difference. The Alfine 8 Premium hub will built into a new wheel with an alloy 650B rim. A new front wheel will also be built with a large flange hub with wing nuts of course. The difference will be that the original Simplex front and rear derailleurs will be retained: the front as a derailleur with the gorgeous integrated chain guard, but the rear just as a tensioner. So at first and even second glance the bike will look original. Tyres will of course be Grand Bois Hetres. The original wheels will be carefully stored so the bike can be returned to original condition in less than an hour

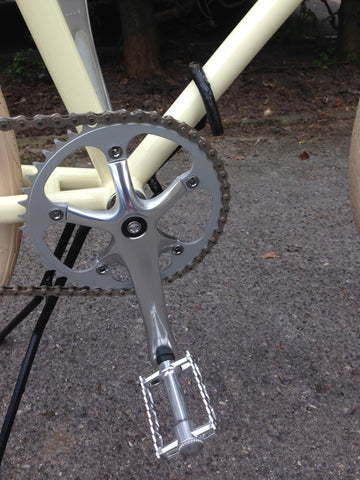
Still to be decided is the chainset. It has a cottered steel double clanger in fine condition, but I truly hate cottered chainsets from a maintenance point of view, so it may well be changed, either for a Stronglight 49D, which would be contemporary and appropriate, or a René Herse replica from SunXCD, which would look very well on this bike. Otherwise Calla will be original. The saddle might have to be swapped for a Brooks though, if it isn't comfortable. The moulded plastic handlebar covers will be replaced by stitch-on leather covers from Velo Orange. The originals are just too horrible to contemplate and have already been covered with cloth tape!

Comments and suggestions are welcome, as the build progresses.
The Orland is such a good platform for customised builds. We got a phone call from Gareth in France. He loves the look of the Orlandi, but lives in a mountainous area of France and wanted an 8 speed Orlandi! The Orlando comes as standard with a 2 speed Sturmey Archer "kick shift" hub, so naturally we offered him a Sturmey Archer 8 speed hub, which slips right in to the dropouts and is available with a range of shifter options. But Gareth was insistent that he wanted a Shimano hub. I had no experience of Shimano hub gears, but did a bit of research and ordered up an Alfine Premium 8 speed hub. This would not be such a straightforward project as a Sturmey Archer hub...
Firstly the Alfine 8 hub is for 130mm OLN frames and the Orlandi is 120mm. However the "road" version of the Alfine 8 has space for a "roller" hub brake as an option, so by removing the a spacer and thick lock nut from the left hand side and replacing the locknut with a thin one, the hub is reduced to 122mm OLN and slides right into the Orlandi dropouts. The hub comes with a neat plastic cover for the roller brake splines which I wanted to retain. so I also had to trim that back by 10mm. Of course the axle was then 10mm too long so that needed to be have 10mm sawn off the LHS. Then just the small matter of building the new wheel.

Those of you have been up close and personal with hub gears know that anti-rotation washers (aka as no-turn washers) are needed) to keep the hub axle from spinning in the drop outs. there are various versions of these for different types of dropout but for the Orlandi rear facing "track" dropouts you need a white one and a silver one. At this point I found the at the flats for the washers did not go far enough inboard on the LH axle, so the axle needed some attention with a file. That done, 10 minutes later the 8 speed rear wheel was fitted.
Just the matter of fitting the shifter now. The Alfine 8 has only a "twist grip" shifter available and this only fits 22.2mm diameter handlebars, so you need to make sure that the bars you choose are available in 22.2mm.
Gareth said he wanted to keep the reverse brake levers that are a feature of the Orlandi and had expressed doubts that these could be fitted in conjunction with twist grip shifter. This was an issue, but past experience with Campag bar end shifters on 60's racers, gave us a simple solution: back in the day for neatness and comfort we used to hide the cabling for bar end shifters inside the handlebars. No reason why this wouldn't work with bar-end brake levers, so a couple of holes were drilled - one at the bar end and another at the cable exit point and the shifter was by-passed.

Just a matter of running the gear cable to the rear wheel (28.6mm Dia Compe Cable Clamps are handy for this) and adjusting, the gears on this hub is simplicity itself.
Half an hour after I finished the job Gareth turned up to collect his new bike and was delighted with the finished job.

This was a first time job for me and I have a bike shop full of parts and all the right tools. If I hadn't, then the few snags that I hit might have cost me days, but if you want to do this conversion yourself , we can put a kit together with all the parts you need, including a modified hub and the right bars and brake levers.
Mike

The SunXCD Orlandi is presented as a stripped down "fixie" style bike, although it is equipped with a 2 speed back-pedal hub gear. This works very well as you have a higher gear for cruising, plus a lower gear for accelerating, without taking your hands off the 'bars. However, in Japan and now here in the UK, the Orlandi is being used as a platform for a huge variety of custom builds. The reason for this is is easy to understand. Not only is the frame elegant with beautiful smooth welds and a paint finish that is worthy of any top-end builder, but SunXCD have built a very good steel frame that is a joy to ride and forms the basis of virtually any style of bike you might wish - from a city roadster, to a fixed wheel/single speed with flip-flop hub or a commuting bike or even a touring bike.
SunXCD have made available some accessories that make customisation easy:
1. The frame is equipped with beautiful forged track ends at the rear, but SunXCD have produced a custom made derailleur hanger. This is also a work of art, milled out of solid aluminium

2. SunXCD have also manufactured a 120mm OLN version of their gorgeous high-flange hub, so you can fit a 5 or 6 speed SunXCD rear derailleur. We can provide you with a 5 or 6 speed cassette.

3. The SunXCD cranksets have now been joined by very elegant René Herse style clover-leaf chain rings. Combined with SunXCD front and rear derailleurs. You will have a truly mouth-wateringly elegant, steel framed 10 or 12 speed traditional road bike.

We are also building a 5 speed Sturmey Archer hub geared version for a customer in more hilly terrain.
If you want to try a custom build yourself we can offer you a base spec. Orlandi for £599 or the frame and forks, complete with stem, seat post, headset and bottom bracket for £399.
Add a selection of the great accessories from our store and you will have an enviable and unique bike. Have look at the gallery below...


Until Grand Bois started making their range of tyres, there were 2 classes of tyre available: lightweight narrow racing tyres and sturdy, but heavy, wider tyres for commuters, cycle tourists and leisure riders.
Racers typically use a 19 - 25mm wide tyre which gives a smaller "envelope" of air touching the road. This means that the tyre has to be run at very high pressure (110-125 psi) to avoid the rim "pinching" the inner tube over bumps and causing punctures. When I was a racer back in the 1960's we were advised to inflate our tyres "board" hard.
Now these hard narrow tyres work very well on perfectly smooth surfaces, but their lack of compliance actually makes them slower on normal roads. (remember a solid tyre with almost no compliance is very much slower than a pneumatic). A slightly wider tyre can make a large difference to the volume of air in the envelope as volume is proportional to the square of the diameter. For example a 25mm racing tyre has 18% more volume than a 23mm tyre. Interestingly racers have gone from 23mm or even 19mm tyres a few years ago up to 25mm wide tyres now in recognition of this and run on slightly lower pressures giving more compliance on normal road surfaces.
Envelope size and compliance are not the only factors in favour of a wider tyre. There is the matter of frictional losses. The friction losses in a tyre are mainly due to the flexing of the tyre wall when the tyre is compressed against the road. The surprising thing about this is that wider tyres have lower frictional losses! This is because the amount of friction is proportional to length of the "footprint" of the tyre in contact with the road. A longer length of tyre wall being flexed will create more friction. At the same tyre pressure all tyres have the same area footprint. If a bike plus rider equals 200 pounds and the tyre pressures are at 100psi, the each tyre will have a contact patch of just 1 square inch. On a 25mm wide tyre this equates to an approximately 1" length of tyre wall being flexed, but a 47mm tyre will have more like 1/2 inch being compressed as it has a shorter, but wider footprint. So why don't racing cyclists use fat tyres?
At racing speeds, aerodynamics come into it: the aerodynamic drag of a 2 inch wide tyre is twice that of a 1"wide tyre, but aerodynamics only come into play at higher speeds. The aerodynamic drag is proportional to the square of the speed. A racer doing 25 mph will experience 4 times the drag of a cycle tourist doing 12 mph. To the tourist, the aerodynamic drag of the tyre is relatively negligible, but to a racer it's important. So for racers it will always be a compromise and at the moment 25mm seems to be the compromise. Also if you have mudguards fitted then the drag of the mudguards is what matters and the size of the tyres is irrelevant. Many people think that racers don't fit mudguards because of the weight, and we have people making very expensive carbon fibre mudguards. It's a waste of money, for a racer mudguards act as parachutes!
So why aren't all of us non-racers fitting wider tyres? Back in the 50s -80s the standard clincher was 1 1/4" for racers and 1 3/8" for utility bikes. This equates to 32mm for racers and 35mm for utility bikes. Most classic steel racers at least up until the 80s were designed to take 32mm tyres and you would be well advised to fit a pair of Grand Bois Cypres. I did to my 1960 Viking Hosteller and it made a huge difference.
One thing is we all like to emulate the racers, thinking that if we have the same kit we will be as fast as them! Also most manufacturers only make wider tyres in heavier construction, as their main market for these sizes are for commuters/utility riders who typically make short journeys are looking for a more robust tyre.
Well what about weight then? Does weight make much difference? A Grand Bois Cerf Blue in 26mm weighs 260 grammes and that is a pretty light tyre. A Schwalbe Marathon in the same size is twice the weight at 520 grammes. The weight difference is less than the contents of your water bottle! Of course the tyre is on the outside of your tyre so the inertia comes into play when accelerating. Again this is important for racers but not for the rest of us. So the weight is not a huge penalty. So why do these heavy utility tyres feel "dead" and slow compared with a lightweight racing tyre?
The answer is compliance. As stated above, the friction in a tyre is due to the flexing of the walls. Racing tyres have thin flexible walls made of a finer fabric with maybe 320 threads per inch or more, compared with a "standard" tyre of 75 threads per inch or less.
Grand Bois tyres are built like racing tyres: light and pliable, but in wider sizes. This makes them unique. You can have a tyre that is comfortable but fast even over rough surfaces. No other tyre can provide this. Some Grand Bois users understand the science behind them, but most just ride them because they know that they are just the best tyres money can buy.
Choosing Your Tyres
Grand Bois Tyres are available in 700C and 650B. Choose the widest your frame can take. There are hardly any decent road tyres available in 650B. Hetre and Lierre are the ones to choose.
http://www.veloduo.co.uk/collections/grand-bois


