Prepare 5mm hex wrench and 17mm thin spanner (thickness 3mm or less)

Insert a 5mm hex wrench into the left side of the hollow axle and loosen the right lock nut with a 17mm spanner.

The cassette body will be removed, but note the cylinder (i.e. Sleeve) of part (1) may stick to the inside of the cassette body and may be removed. Also pay attention to the direction of the rubber seal of (2).

There is a 1mm thick washer (3) in the outer seal of the cassette body, so please remove it. In case of change to Shimano, place this washer between the left lock nut and the dust cap. The rubber seal of (2) is also attached to the replacement cassette body, so be careful not to double it.

Is it 531?
We get a lot of questions about old steel frames people have found and are wondering "If they are any good", by which they mean "What is the quality of the tubing?". There are several tubing manufacturers Reynold, Columbus, Tange and Dedaccio being the most famous. Major manufacturers often had their own tubing brands: Tru-Wel was Raleigh's. Manufacturers' own tubing is not always inferior. Perhaps they just didn't want to pay a premium for a well known brand.
The myths inevitably start with Reynolds. Like "531 is the best!" 531 is their brand name for a steel alloy: Chromium-Manganese in fact. The generic "Chromoly" is another alloy. So why does the alloy matter?
There are 3 aspects of tubing to take into account: Composition, Construction, and Heat Treatment.
Composition
This is the composition of the steel alloy used to make the tubing. The primary one is carbon content, but minute quantities of other metals are alloyed with the steel to enhance its properties to make it better suited for bicycle frames. The best steel frames are "springy" and give a livelier feel when riding. The alloy makes no direct difference to the weight, but a better alloy may enable the tubing to by made with thinner walls and therefore result in a lighter frame. Reynolds 531 is just a brand name for their own chrome-manganese alloy. As we know in the modern era, brand names are all powerful and consumers (that's you and me!) will pay more for a recognised brand. It is a guarantee of confidence in the quality. Generic chrome-moly frames are not necessarily "gas pipe". This is just a derogatory term to make you want to buy a "brand".
4130 steel - an alloy steel - which is commonly known in the bike industry as chrome-moly, contains the following alloying agents: 0.28- to 0.33-percent carbon, 0.4- to 0.6-percent manganese, 0.8- to 1.1-percent chromium, 0.15- to 0.25-percent molybdenum, 0.04-percent phosphorous, 0.04-percent sulphur, and 0.2- to 0.35-percent silicon. The other 95 percent is iron. Reynolds 520 and 525 are 4130. It has the big advantage to volume frame builders that it can be welded, whereas the old 531 ca not be welded. Instead it has to be brazed or silver-soldered.
1020 steel, which is called plain carbon steel, and has significantly lower strength than the chromium-molybdenum steels, so the tubing needs to be thicker.
Construction
How the tubing is made is also important. The cheapest tubing is made from flat steel rolled into a tube and welded along the seam. The weld weakens the tubing so it needs to be of a thicker gauge and therefore heavier to be strong enough. The best tubing is die-drawn and seamless. This can be made thinner. Once the tube is made and painted, you can't tell how it has been made, but put your finger inside the tube and you will feel the join. You may have heard the terms "butted" or "double butted". This means the tubing is thicker at the ends, where it is brazed or welded to another tube and thinner in the middle. This makes for an even lighter tube. You may be surprised to learn how thin the tubing is in the middle and how easily it dents, which is why butted tubing is usually reserved for lightweight racing bikes. "Double butted" just means it is thicker at both ends, tapering to the middle and "Single Butted" means it is thicker at one end. Single butted tubes are usually used for stays and forks. Some modern tubes are "triple butted" meaning that there are 3 different wall thicknesses - the thinnest being in the middle.
Heat Treatment
Forming and welding the tubing affects the properties of the steel, so tubing is often "heat treated" i.e. heated to a specific temperature and cooled at a controlled rate, to minimise these effects. Brazing or welding the tubing together to make a frame can degrade or destroy the treatment. This where the skill of the frame builder comes in: under-heating can result in a poor joint and overheating can damage the tubing, possibly resulting in the frame cracking and breaking at some time in the future. This why some tubing manufacturers require frame builders to be licensed to build with certain tubes (Reynolds 753 is an example). Steel tubing was always brazed for this reason as welding creates higher temperatures. Some modern steel tubing can be robot-welded without damage. ~Hence cheap steel frames of good quality emerging from factories in Taiwan nowadays.
So it seems that the simple steel tubing used to make bike frames is actually a high tech product! It's a complicated business, which is why we tend to rely on brand names and why Reynolds rules!
Size Does Matter!
Perhaps you have found an old frame, that has been re-sprayed and you have no idea of its quality? Or perhaps it has been resprayed and someone has affixed a sticker, but you are not sure its is pukka? Well it's kind of obvious when you think about it, but seat-post size is an indicator. Nearly all steel frames have a seat tube of 28.6mm outside diameter. The seat post is of course, the inside diameter. Every schoolboy (used to) know that Reynolds 531 butted has a seat post diameter of 27.2mm. So the wall of the tubing is 0.7mm thick at the ends and even thinner in the middle (I said you may be surprised). At the other end of the spectrum some heavyweight bikes take a seat post of 25.0mm which implies a wall thickness of 1.8mm - more than twice the thickness and hence more than twice the weight, especially as it is not butted ! This doesn't mean the frame will be twice as heavy, as there are bottom brackets, lugs, stays and forks to take into account, but it will certainly be a lot heavier relatively. So as a rule of thumb, if you are looking for a lightweight frame, the thicker the seat post the better. This does not of course take into account the composition or construction of the tube and the skill of the frame builder. So the perennial question is 531 better? The answer is nor necessarily.
What tubing does my frame have? If it is 531 butted the seat post size will be 27.2mm. If it 531 plain gauge it will be 26.8mm. Anything smaller implies a thicker tubing and a heavier frame.
Peugeot Tandems
Maintaining and Updating The Peugeot Tandem
Mudguards/Fenders
Details
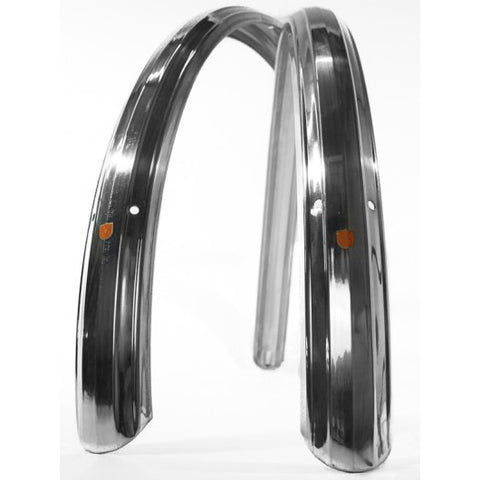
The mudguards originally fitted were stainless steel and also served as mountings for the dynamo lights. For this reason they had thicker than normal stays and unique mounting points.
Front Mudguards
There is no mudguard bridge as such, but a pair of brazed on tabs on the fork crown securing the mudguards by 2 pairs of nuts and bolts. Ther headlamp mounting on the front is supported by a sturdy "U" shaped stay and a second stay is fitted to the bottom of the mudguard.
Rear Mudguards
The rear mudguard has only one stay. It is at the bottom rear of the mudguard. Instead of a top stay the top of the 'guard is secured to the carrier rack by a bracket. Instead of a mudguard bridge there is an alloy cast part that is secured to the mudguard by a spring clip and secured to the bridge on the frame by a nut and bolt. This part also serves as the mounting for the carrier rack.
What to Do
If your mudguards are bent or scratched or you just want to replace them with something lighter, you can replace them with Velo Orange Zeppelin Mudguards which are very similar in design to the original Peugeot ones and use the same fittings.
Peugeot Tandems
Maintaining and Updating The Peugeot Tandem

Chainsets
Peugeot fitted either Stronglight 49D or Specialites TA Pro Vis 5 (also known as "Cyclotouriste") cross over tandem chainsets. These are now VERY sought after and sell for about £100 (GBP). The original gearing was somewhat high, so if you are going touring and plan on scaling any major hills, the chainwheels can be changed for smaller ones than the original 52/42T. The photo is of a Stronglight set. The TA is the one fitted on the tandem in the banner photo.
Please note that later tandems were equipped with a Stronglight 90 chainset. Rings for these are no longer available so you will need to upgrade to a new chainset.
Pedals
If you want to replace the pedals with modern ones - Beware! Both types of chainset are threaded for French pedals, which are not easy to find. This is not a big problem as the French pedal thread is very close to English threading and the cranks can be easily retapped to English threads by any competent bike shop. Alternatively you can send them to me and I will do the job for a reasonable price (see Services)
What to Do
You will need a special Crank Extractor tool to remove your cranks. This a different size to the modern ones. Suitable crank extractors are made by Jim Stein in the USA. We usually have them in stock so if you need one contact us The chainsets use a BCD (bolt circle diameter) of 50.4mm which is different to modern chainsets.
We stock replacement chain rings for the TA "Cyclotouriste" chainset in a wide variety of sizes (26t to 52t). The good news is that they also fit the Stronglight 49D cranks but only if you replace both chain rings of the double chainset (RH rear).
The SunXCD 50.4mm crankset that we stock is a close copy of the Cyclotouriste chainset, but remember that only the rear RH crank is standard on a tandem crossover drive, as the pedal threads are different for RH and LH pedals.
Upgrading to triple chainset
This is possible with the TA Cyclotouriste and you can retain your existing inner and outer chain rings if you like but you will need to buy an additional inner chain ring PLUS a set of nuts, spacers, washers and bolts for a triple. The bolts are expensive - approx £40 GBP at time of writing. For Stronglight you will need to buy all 3 chainrings plus the triple bolt set. You will also need a longer rear BB spindle. I used 132mm which works fine but is maybe just a little too long. I have fitted 46/36/26 with an 11-32T cassette, which gives me a gearing from 22" to 113" which should be adequate :-)
We stock all the parts for a triple conversion
Peugeot Tandems
Maintaining and Updating The Peugeot Tandem

Rim brakes
The Peugeot Tandem is equipped as standard with 3 brakes. This is very common on tandems, to cope with the additional weight. The rim brakes are special Mafac Tandem cantilevers mounted on brazed-on bosses on the forks and seat stays.
The third brake is a drum brake fitted to the rear wheel and is intended as a "drag brake" for scrubbing off excessive speed and controlling long descents before bringing the machine to a halt with the rim brakes. The arrangements for controlling the brakes is unusual, though not unique. The drum brake is controlled by the left hand lever and both rim brakes are controlled by a special design of lever with a dual cable entry. This arrangement works well in my experience, but some teams have adopted the more common arrangement to control the hub brake of a lever on the stoker's handlebars or a ratchet gear shift lever on the captain's.
The drum brake is covered in the Rear Hub/Brake blog of this website. this blog covers the rim brake arrangements.
Rim Brake Details
The spacing of the bosses for the cantilever brakes is wider than those on modern bikes, so the standard cantis can not easily be upgraded to "direct pull" brakes otherwise known as " V brakes", which are made for a post spacing of 80mm. Neither are new cantis available for this post spacing (62mm). The best option is stick with the existing brakes, which are more than adequate.
Note some later Peugeot tandems have "standard" cantilever brakes rater than tandem ones. These are less effective.
Peugeot Tandems
Maintaining and Updating The Peugeot Tandem
Rear Hub Brake

This was the real Achilles heel of the bike. This is not really a major problem unless you want to keep your tandem original, because you can substitute the wheel for one with a modern tandem hub/brake unit. It may well have been replaced already on your tandem. if not here's what you can do.
Hub details
Originally fitted was an "Atom" hub with integral drum brake. This hub was designed for a light moped (the Mobylette I believe) and it is possible that parts are still available in France via their enthusiastic owners club. I have just heard that there is a moped spares supplier that is holding stocks of spares for the Atom Hub. He is Barry Ward of Wednesbury West Midlands email bwace@msn.com
What to do
The axle/spindle originally fitted was too thin and bent or even broke. Even if it only bent, this put the bearings out of adjustment and readjusting the bearings is a long and tedious procedure, involving disconnecting the drum brake cable unbolting the wheel removing the brake assembly and adjusting the cones. It is many a time I have had to do this on the road when carrying panniers and/or a child on a child seat. In the early 80's a thicker 10mm axle was used and early hubs could be upgraded to use this item by drilling out the brake unit to accept the thicker axle. This was better but still bent under load and the bearings always seemed to be a bit loose! Recently I have been able to fix this problem by using a hardened steel axle from SJS Cycles in Bridgwater England. I also bought a standard 10mm mountain bike rear axle and cone set from a local bike shop and used the cones and locknuts from that and the hub has given no problems since. This axle is nice and long so you can upgrade to a 7 speed freewheel if you wish (you will need to widen the rear dropouts though see the section on gears) However I must confess to retiring mine recently as I was offered a new old stock tandem wheel with screw-on hub brake for a very good price.
The hub brake was also quite ineffective for 28 of the 29 years I owned the bike. However, I latterly cleaned and degreased the brake drum and roughed it up with sandpaper and did the same with the shoes (wear a mask please, because the linings may contain asbestos which is injurious to health). Since then it has been much better. If you need to replace the shoes, the UK Tandem Club can direct you to a supplier that can reline them for you.
The other problem with the rear hub is that it is designed for screw-on freewheels. These are still available, but only use the highest quality freewheels as the cheap ones will fail! I have found Shimano Megarange freewheels to be OK so far, but I have a had a cheaper Shimano fail after a couple of rides.
Unless you are very keen to maintain originality, I would advise you to fit a modern tandem hub with freehub. This will make upgrading gears much easier too. You will need to cold set the rear dropouts to be wide enough for your selected hub (usually 140 or 145mm). How to do this is detailed on Sheldon Brown's website and the procedure described does work. I have now done 5 bikes successfully.see http://www.sheldonbrown.com/frame-spacing.html
The Shimano XT tandem hub (8/9 speed 145mm OLN) is ideal and is threaded for a screw-on drum brake, like the Araya this is a fantastically efficient brake but has recently gone out of production. However they still come up occasionally on ebay (get one if you see one!). Don't worry about the brake linings wearing out by the way as they are reputed to last for about 40,000 miles and can be relined anyway!

I have fitted the Sturmey Archer XRD-C rear hub to many tandems. This is a more modern version of the Atom hub. It has a built in drum brake and a freehub to fit a modern 8 or 9 speed cassette or a 7 speed cassette with a spacer. It fits the existing brake mounting fine, but you may need to cold set the rear dropouts slighty to 130mm. The reaction arm (just) fits to the braze-on fitting of the frame without modification. It seems to be a high quality product with smooth running cassette bearings. Other people have used them on tandems without problems
You might be thinking about upgrading to disc brake, like many modern tandems. If you do this, you will need a suitable hub and you will need to get a framebuilder to braze on the mountings for the disc brake, which will require repainting of the frame. However if you are getting the frame refinished anyway, it would be worth considering as the screw on hub brake is no longer made. There are no disc brakes designed for tandems at the moment and there is the risk of the pads overheating on long descents , but some tandemists are using heavy duty down hill mountain bike disks. You can convert your screw on hub brake hub to disk using this gizmo from DT Swiss for about £20 available from SJS Cycles SJS Cycles Part Number: 12727
Peugeot Tandems
Maintaining and Updating The Peugeot Tandem
 Bottom Brackets
This issue has the potential to be a real showstopper. This is where the French heritage really starts to be a problem. New parts are no longer available so you will need to upgrade. Find out how...
Bottom Bracket details
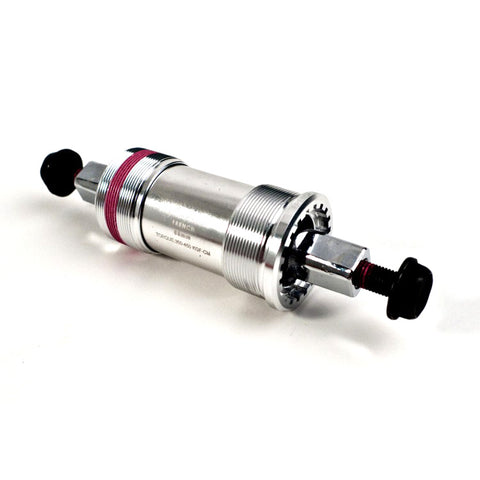
The bottom bracket is the cylindrical shell that hold the axle/spindle and bearing for the crank arms. It may surprise you to know that there are many different sizes. For full explanation see Sheldon Brown. The vast majority of modern bikes are "BSA" = British (1.37" x 24 threads per inch) with the right hand side (fixed) having LEFT HAND thread and a 68mm shell width (mountain bikes have a 70,mm shell width). The Peugeot being French is different. It has a different thread 35 mm X 1mm (25.4 tpi) and both sides are RIGHT HAND threaded. This means that the right hand cup is prone to come unscrewed. It has only happened once on my bike, but some people have regular problem with it. However this isn't the main problem. French BBs are long obsolete, so if your BB cups are worn out, then you can't get new ones. Neither are modern "cartridge" BBs readily available in French threading. Also many people (including me) have found that the threads are damaged anyway. If the cups are OK, it is just the spindle you need to change. These are getting harder to find although there is plenty of old stock still around. Measure your spindle length and try and get one of the same length. Remember that the original TA and Stronglight cranksets were ISO and the majority of replacement spindles are the Japanese JIS standard. This means your original crankset will sit approx 3mm further out than on the original axle so you can go for a slightly shorter one. The shell width is the "road" 68mm standard, but I have found some (not all) 68mm replacement spindles allow the cups to screw in slightly too far and there is not really enough threads to get the lock ring securely on with at least 1 thread protruding. I am not sure why this is, but it might be due to the design of the French cups. So, you might be better off getting an MTB standard 71mm replacement spindle. If it is too long, you can can place a Sturmey Archer sprocket spacer, which is exactly the right size, between the fixed cup and the bottom bracket shell.
Measuring spindles is a bit of a nightmare! Some are made symmetrical (the more modern ones) and some are asymmetrical i.e. the spindle is longer the chainset side (which is logical). The originals are asymmetrical, so if you buy a modern symmetrical spindle, you will need to get a longer one. This is exacerbated by the fact that the TA and Stronglight chainsets need to sit further out from the BB shell than modern ones, to avoid contacting the chainstay, so you need a very long exle by modern standards, particularly if you have a triple. I used a 5R 132mm (asymmetric) spindle for my TA triple, which worked out fine. By contrast a modern triple specifies 123mm. The best solution is if you can find a nice old fashioined bike shop which has a drawer full of spindles to try a couple to find out what fits best. At the time of writing SJS Cycles are selling off their old stock at £4.99 each, so its economical to order 2 or 3 and find which fits best. There are dimensioned drawings of each on their web site which helps. You can always sell off the unwanted ones on ebay!
How to fix it!
There are two "easy" solutions that I know of.
1. Velo Orange in the make French threaded cartridge BBs. They are vey nice quality items, but require a little fettling before they fit. The original French cups are quite shallow whereas the V-O ones are about 3mm deeper. The threading in the BB shells is only as deep as the original cups, so you need to remove about 3mm of thread from the inner end of the cups. This takes a couple of minutes or less on a bench mounted belt sander, but you can use a small hand file. Once this mod is done they fit just fine. PLEASE NOTE: The maximum length they have is 122mm, which is shorter than the 126mm that comes as standard. You might be able to use this with a double TA Cyclotouriste or Stonglight 49D chainset if you add a spacer. On the other hand 122mm works fine with a modern triple chainset.
2. Velo-Orange also make a "threadless" bottom bracket," which some Peugeot Tandemists are using.
Obviously a tandem requires 2 bottom brackets, so that means double trouble.
A permanent solution to consider, if you are have the bike repainted is to get a frame builder to fill the old threads with braze and re-tap the BB shells to standard British threads then you can use a standard cartridge BB.
Peugeot Tandem
Maintaining and Updating The Peugeot Tandem
HeadsetThe headset is another potential dead-end, being a long obsolete "French Tandem" size. However, due to a happy co-incidence, it is possible to use modern parts to replace the wearing surfaces. See details below:
Headset DetailsThe now obsolete French Tandem headset has the following dimensions:
Steerer O/D 28.04mm (ISO Standard 1" threaded = 28.6mm)
Steerer I/D 22mm (approx=ISO Standard 1" threaded)
Steerer Threads 1mm (25.4 tpi)
Frame cup O/D 34mm (= 1 1/8" standard)
Crown race I/D 30mm (= 1 1/8" standard)
How to Service or RepairFrom the above data you can see that you can use the frame cups, crown race from a standard 1 1/8" threadless headset. In practice it is only the lower bearings that wear as they bear the weight and you can just replace the the crown race, lower frame cup and the bearing and re-use the upper bearings already fitted to your tandem. In practice you can replace both upper and lower bearings, by using the locknut from the old headset to pre-load the bearings (see photo) the brake cable hanger acts as a lock washer.
It is best to use a high quality headset due to the extra stresses of a tandem. Also pay attention to the stack height to ensure a good fit.
The inside diameter of the steerer is close to the ISO 1" standard (just 0.2mm smaller) so in practice you can use a standard stem for a 1" threaded headset. You might have to remove 0.2mm of metal from the stem with emery cloth, but on my bike a standard stem fitted perfectly.
Lost Lanes Posted on 29 Jan 19:37 , 0 comments
LOST LANES
I have long been a fan of
The Bike Show podcast presented by Jack Thurston. Jack contacted me recently for some help with a project, but more of that later. He mentioned that he has written a series of books entitled "Lost Lanes" and was kind enough to send me one of the books to review. These books epitomise the kind of cycling I love: quiet lanes, mild unsurfaced sections and beautiful scenery. Jack has taken some stunning photos and has written graphic and informative descriptions of the routes.
The routes themselves are all circular and around 40 miles, starting/ending from points accessible via road and rail, so making for easy day rides. Jack has graded them from "easy" through to "challenging", to give you an idea of whether the route is suitable for you.
From Jack's description, you can do the rides on almost any bike, other than a super-lightweight racing bike, although my son once did a loaded tour with me on his carbon fibre Cube with 25mm tyres. This route included some very rough towpath sections of the Kennet & Avon canal!
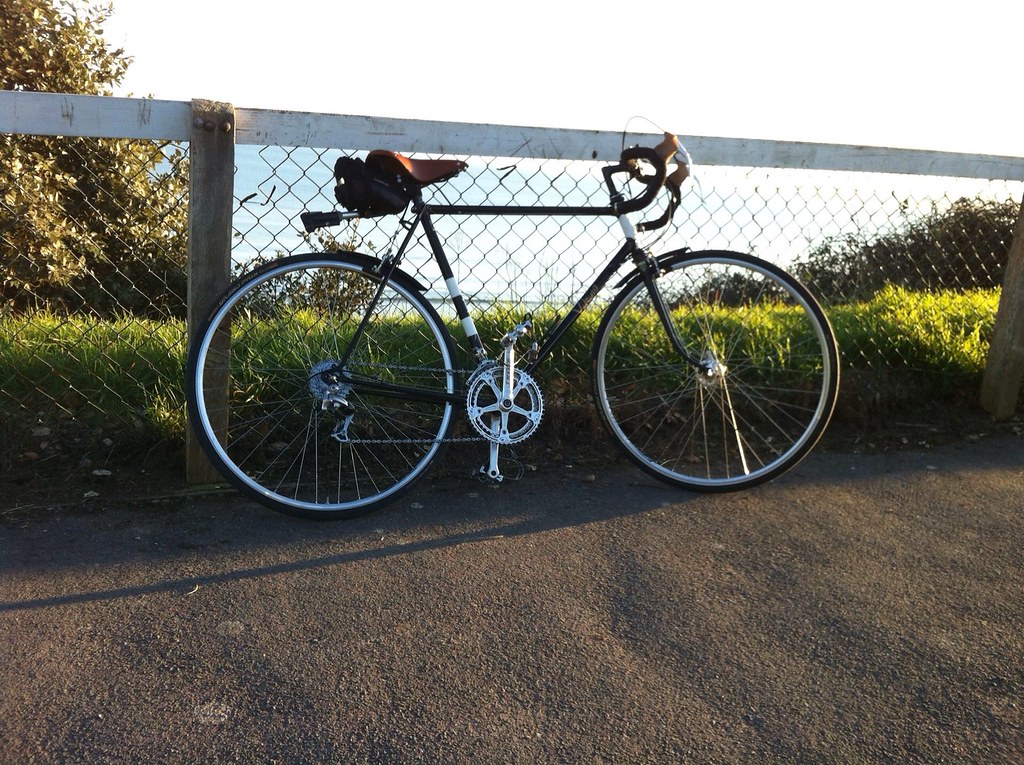
Jack is doing a speaking tour about the Lost Lanes books and the most common question he is asked is "What kind of bike?", so Jack is building his ideal "Lost Lanes" bike. The bike Jack is building is 650B on wide tyres with a steel frame. I won't say any more until the bike is launched, but you will be able to see it at
Bespoked Bristol in May 2019. As I said at the beginning of this article "Lost Lanes" describes my ideal rides in many ways, so I have my own ideas of the ideal bike for this kind of cycling, which isn't too far away from Jack's ideas too. The frame I chose for my own Lost Laner was the Velo Orange Polyvalent, as described
here . This really a modern copy of my 1951 Calla "Old French Hiker", which I restored and updated a while ago. This restoration is documented in 4 blogs starting
here
If this kind of cycling appeals to you, have look at Lost Lanes, so far they cover, Wales, the South and the West of England. Just follow
this link and get one of the books and get lost in the lanes with Jack.

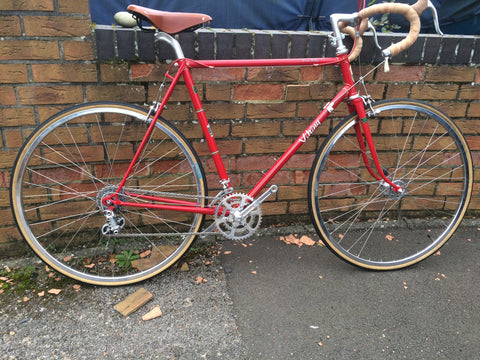
 Most people who restore old bikes, do so for reasons of nostalgia. They either had that particular model in their youth, or maybe wanted one and never got it. Sometimes it was their dad's or grandad's bike. In the case of my Viking Severn Valley, it was the first. I was 16 and in the market for a new frame and for some time I'd had my eye on a red Cinelli hanging in Fred Williams' shop in Wolverhampton, the nearest large town to where I grew up.
After I had saved up the money, I cycled my old bike up to the shop and tried to part exchange it for the Cinelli. I had removed all the good components and substituted the worn-out old ones. Fred was not impressed with my bike so I declined his low offer and decided to make a cash deal for my Italian dream frame. Problem was, Fred didn't want to sell me the frame and put all of his sales skills into selling me a "nearly new" Viking Severn Valley he had in the back of the shop. The story was it had been built up for a show (the CTC York Rally), but never ridden. Fred had bought it off Viking after the show. The probable truth was that Fred had stripped it for parts and was now trying to dispose of the frame to this first mug that walked into the shop (me!). However the Severn Valley was undoubtedly a better frame than the Cinelli: Reynolds 531 double butted throughout with Nervex lugs and by the time the bike was built up I was very pleased with the bike. The sale of my old bike financed the purchase of some new parts for the SV.
I used it for everything: riding to school, racing, time trials, day rides and even a tour to North Wales, but I soon became more interested in girls than bikes and you can't carry your girlfriend on the back of a racing bike, so it was sold to finance the purchase of a Vespa!
Having resumed cycling a few years later after finishing Uni, I owned quite a few bikes over the years, but started hankering after another Severn Valley. After a couple of years, I found one on eBay, won the auction and just before I was going to collect it from Devon, the seller contacted me and let me know that his son had reversed his 4-wheel-drive over the frame in the garage! I managed to find a Viking Hosteller as a substitute and painted it up in the same colour scheme as my old Severn Valley. It was a great bike but was way too small for me and I couldn't get comfy on it, so I sold it on to a shorter friend of mine.
My search for a Severn Valley proved fruitless, until I bought some rims from a seller on the CTC forum and whilst I was talking to him about bikes in general, he revealed he had a Severn Valley frame in his loft and if I called back in a week or so he would get it down for me. The story was he got it off an 80 year old, who was planning to restore it to Viking team spec. The seller threw in a suitable frame for my son's fixie project and the deal was done. There was hardly any paint left on it, burnt off by brazing work - the often-flattened rear brake bridge had been replaced and bottle cage bosses had been fitted.
My rule, which has often served me well, is to build up and ride the bike, before any paintwork is done, in case any "engineering work" needs to be done and more importantly to find out whether I like the bike! This one was too bad to ride with no paint, so I threw it in with a batch of black powder coating I was getting done. Sprayed a white contrasting panel with an aerosol can and applied the correct transfers and a repro head badge given to me by the previous owner, the original having been lost (or flogged off!). It did look quite smart for very little outlay. I built the bike up with spare parts I had lying around and started to ride it regularly. I found my fond memories were correct and it was a lovely ride. I decided to build it up with the parts I would like to have had, but couldn't afford back in my teens. It took me a year and more than £800 to accumulate the Campagnolo hubs, derailleurs, crankset and bar end shifters, that were "top-end" back in the day. I used it for a circuit of the Isle of Wight and realised the racing gearing was too high for me.
But my aim when I bought it was to use it for a tour of the the Severn Valley (the race the frame was named after), so I sent it off for a respray in the Post Office red team colours of my original Severn Valley. I also asked for the buckled seat stays to be straightened. Either it had been in an accident at some time or someone was trying to create a curly Hetchins replica. I also got the rear end widened to 130mm in case I wanted to fit a later hub. The frame builder did a great job and also researched the correct colour scheme and transfers for the team bikes of the year of manufacturer. The problem was the repaint took much longer than anticipated and I had to use another bike for the Severn Valley tour, but Eroica Britannia beckoned.
Memories of the Isle of Wight urged my to change the gearing and the Campag 53/42 crankset was replaced by a period-looking Velo Orange TA Cyclotouriste replica

and the wheels were rebuilt with 700C Velo Orange Paris-Brest-Paris rims, which look just like the Fiamme sprint rims I had fitted back in the day. Grand Bois 26mm tyres completed the build. Brakes are long-reach Mafac Racers, made back in the times when we rode 27 x 1/1/4" wheels for training and 700C sprints and tubs for racing.


 Bottom Brackets