Building Your Orlandi Posted on 17 Jan 00:20 , 0 comments

Unless you ask us to build your new bike and you come and collect it, your bike will be delivered partly disassembled in a box. The Orlandi is easy to assemble with simple tools that you will have in your garage.
If you do not feel confident to assemble the bike, ask your local bike shop to do it for you.
You are recommended to get the bike safety checked by a competent cycle mechanic before riding it.
Tools
You will need:
A 15mm open ended spanner
Allen keys
Small screwdriver
Tyre pump
Cable cutters.
Unpacking
Before unpacking, check you have received the bike you ordered.

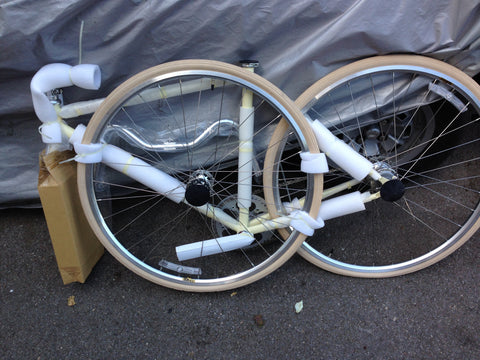
Open the box! You will be relieved to find that it is mostly ready assembled:

Remove all packaging, padding and cable ties before working on the bike. Turn the stem /forks so they extend forward. One box contains the saddle and the other the brakes, pedals and other fittings
-
Wheels
- The rear wheel is already installed and the chain tensioned. Just check that the wheel nuts are tight before riding.
- Install the front wheel and secure the wheel nuts with a 15mm spanner
- Inflate the tyres to the correct pressure indicated on the tyres.
- Handlebars: Insert the handlebars into the stem, being very careful not to scratch them and tighten the securing bolt on the stem. They can be installed either way up, depending on the riding position you prefer.

- Brake Levers: Install the brake levers into the ends of the handlebars. Note: The levers are installed with the “Tektro RX 4.1” logo visible from the outside of the bike. Tighten the expander bolts securely.

-
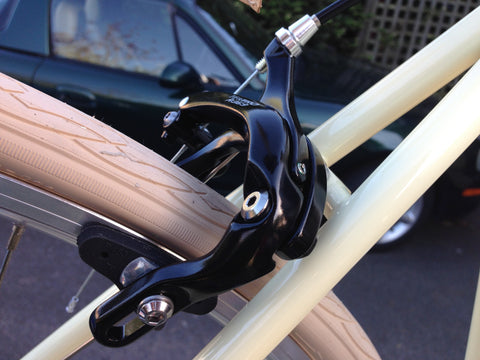
Brake Calipers: Note the front and rear brake calipers have different length bolts. The longer bolt is for the front.
-
Install the front brake caliper from the front of the forks, threading the bolt through the hole in the fork crown from the front and securing the nut at the rear of the crown with the allen key.

-
Install the front brake caliper from the front of the forks, threading the bolt through the hole in the fork crown from the front and securing the nut at the rear of the crown with the allen key.
-
-
Install the rear brake caliper from the rear through the hole in the rear of the brake bridge. Secure the nut using the allen key. Do not overtighten the nut.
-
Install the rear brake caliper from the rear through the hole in the rear of the brake bridge. Secure the nut using the allen key. Do not overtighten the nut.
-
Brake Cables:
-
Front Brake: Insert the nipple of the inner cable in the lever and lead the brake cable to the front caliper. Thread the inner cable through the adjuster and through the clamp on the caliper.
- Adjust the brake blocks so they contact the wheel rims squarely. Ensure the brake pads do not touch the tyre! Grasp the calipers in one hand and squeeze the pads together so they nearly touch the rim and tighten the cable clamp.
- Adjust the brake pads until the clear the rims by a few mm. Make sure the bolts securing the brake pads and cable clamp are tight.
-
Front Brake: Insert the nipple of the inner cable in the lever and lead the brake cable to the front caliper. Thread the inner cable through the adjuster and through the clamp on the caliper.


- Cut the inner cable to length and install and crimp the cable end cover
There are many videos on YouTube explaining how to adjust your brakes correctly. For more information visit http://www.sheldonbrown.com/rim-brakes.html#shoeadj
-
Rear Brake:
- Install the cable in the lever as described above for the front brake. Route the cable over the top of the top tube (crossbar) and secure with the 25.4mm Dia Compe Cable clips supplied. You will need a small screwdriver to do this.
- Measure and mark the required length of the brake cable
-
Withdraw the inner half way and cut the outer to length


- Install the inner cable and adjust the brake pads and cable as described above.
- Cut the inner cable to length and install and crimp the cable end cover.
- Taping the handlebars. For the best look and performance run the brake cables under the bar tape until just before the bars start to bend. Please follow the detailed instructions here: http://www.sheldonbrown.com/handlebar-tape.html

-
Installing the saddle and seat post.
-
Seat Post: Loosen of the seat tube clamp and insert the seat post to the “Minimum” mark and tighten the seat clamp. IF YOU REQUIRE THE SADDLE HIGHER THAN THIS YOU WILL NEED TO BUY A LONGER SET POST. It is advisable to grease the seat post with Vaseline or grease before installing to prevent it seizing to the frame in the distant future!

- Attach the saddle to the seat post and adjust as required. See http://www.sheldonbrown.com/saddles.html
-
Seat Post: Loosen of the seat tube clamp and insert the seat post to the “Minimum” mark and tighten the seat clamp. IF YOU REQUIRE THE SADDLE HIGHER THAN THIS YOU WILL NEED TO BUY A LONGER SET POST. It is advisable to grease the seat post with Vaseline or grease before installing to prevent it seizing to the frame in the distant future!


-
Pedals: Note the left and right pedals are different. They are marked L & R
-
Take the Right Hand pedal (marked R) and carefully screw it hand-tight only into the crank arm. Secure with a 15mm spanner.
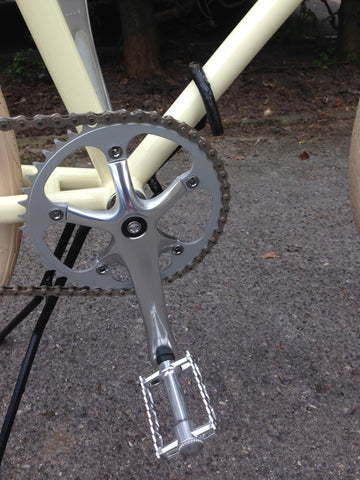
- Take the Left Hand pedal (marked L) and screw it ANTI-CLOCKWISE into the crank arm. Secure with 15mm spanner.
-
Take the Right Hand pedal (marked R) and carefully screw it hand-tight only into the crank arm. Secure with a 15mm spanner.
- Accessories. Install bell and reflectors as required by law.


- Safety Check. Check the brakes are working properly before riding the bike and that the handlebars and stem, saddle and pedals are secure.
Enjoy your Orlandi!!
