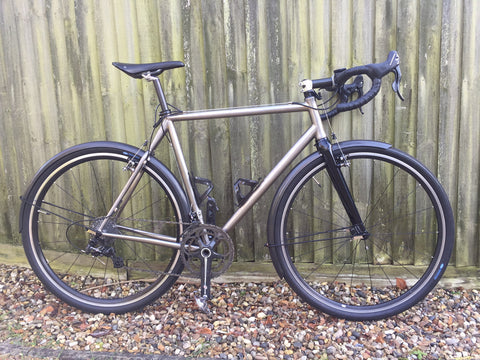
Mudguards/Fenders Fitting Instructions
Mudguard/Fender Installation
IT IS NOT RECOMMENDED TO FIT MUDGUARDS TO BIKES WITH KNOBBLY TYRES OR FOR OFF-ROAD USE
Applicable to Velo Orange, Gilles Berthoud and Carbon Fibre Mudguards/Fenders
There is a video here https://youtu.be/DFF2PIckatE?si=7WsKD0aZK35xsh_t
If you don't feel confident in fitting the fenders yourself, ask your local bike shop to fit them for you. It should take about 4 hours to fit a pair.
Tool list:
- Allen wrench set
- Hacksaw or big wire cutter for cutting stays
- Felt tip marker
- Masking Tape
- Phillips head screwdriver
- Pliers
- Drill with 5mm and 6mm bit
- Small file (optional)

Attaching the fender stays to the fenders:
Attach the stays to the front and rear fender using eyelet bolts as described below. On Carbon Fibre fenders please use 2 eyelet bolts per fender as shown in the photo below, except for 700C x 35mm. Please ensure that the 2 holes for the eyelet bolts are lined up horizontally so as to ensure the bottom of the blade is centred on the tyre. The eyelet bolts for the stays should be attached 50 - 75mm maximum from the end of the blade to provide maximum support and reduce flex, especially if you are fitting a reflector, rear light, or mudflap.
Gilles Berthoud fenders and some of our carbon fenders come with stays that bolt to the fender with 2 small screws, nuts and washers (supplied). Carbon fibre mudguards are not pre-drilled.
Leather washers are not supplied with Carbon Fibre or Gilles Berthoud Mudguard Hardware Kits.
- Thread the stay into the eyelet bolt's hole.
- Place the “cup washer” over the bolt with the hollow side facing the stay.
- Insert the threaded portion of the bolt through the hole in the fender. For two bolt fenders, insert them one at a time, rotate the second into place - it may be necessary to flex things a bit to fit.
- Place the washer under the nut; thread on the nut, but don’t tighten it fully yet.


Attaching the FRONT fender directly to the fork crown
PLEASENOTE THAT 20" CARBON FIBRE MUDGUARDS COME ONLY IN ONE LENGTH, SO YOU MAY NEED TO TRIM THE FRONT MUDGUARD. YOU CAN DO THIS WITH A ROTARY TOOL SUCH AS DREMEL.
Some frames, have a threaded boss under the fork crown.
- Remove your front wheel.
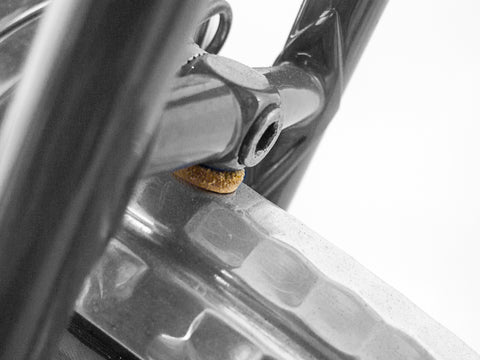
- Place a 5mm screw with washer through the front fender hole. The screw head and washer should be inside the fender. With Carbon Fibre blades the holes are not pre-drilled. Please choose a position that suits your installation and drill a 5mm hole in the mudguard for the daruma. Some carbon fibre blades have a slightly flattened area which is the intended position for the daruma. If you are not using a daruma, drill a hole in the appropriate position to attach with a Single Hole L Bracket (supplied) to the front of the brake bolt, as described below.
- Place a leather washer over the screw on the outside of the fender. The leather washer absorbs vibrations and cushions the fender, helping to prevent cracking at the bolt hole.
- Screw the fender to the the underside of the fork crown.
- (Not applicable to carbon fibre mudguards) Since the fork crown on some bikes is not perfectly tangential to the wheel, you may need to align the fender to the wheel. Simply hold the fender on either side of the fork crown and apply a little pressure to line it up with the wheel. This will make a little dent in the fender around the mounting screw and allows the fender to line up with the wheel.
- Carbon fibre mudguards only. If the front mudguard does not align to the wheel correctly using a daruma, use the L bracket instead (see below). The angle of the L bracket can be adjusted to obtain a satisfactory alignment. You must remove the L bracket from the mudguard to adjust the bend or you will damage the mudguard.
- If the front of the mudguard is too close to the tyre, it is best to attach the L bracket to the FRONT of the fork crown so the bracket can be adjusted such that the mudguard clears the tyre.
- You can adjust the clearance at the bottom of the mudguard, by adjusting the stays at the dropouts
- Replace your wheel and check the fender’s alignment.
- If you’re using small tires, or there is too much mudguard clearance you may want to space the fender downward; stack some presta-valve locknuts on the screw to move the fender downward.


Attaching the front fender to the fork on other bikes
If your bike doesn't have a fender boss under the fork crown you'll use a fork crown daruma or an L-bracket to attach the fender to the fork crown. Let“s cover the daruma first, since that“s the preferred method and applicable to most bikes with steel forks.

- The daruma fits over the brake bolt inside the fork crown. Unbolt your front brake. If your bike has canti brakes or has no front brake, use a a 6mm or 1/4" bolt around 50mm long from the hardware store.
- Hold the daruma inside the fork crown and slide the brake bolt through the hole in the daruma.
- Re-tighten the brake bolt nut so the brake is reinstalled.
- Place the large metal washer, then the rubber washer, over the threaded end of the daruma. See photo below.
- Slide the fender onto the daruma.
- Secure the fender using the smaller flat washer and nut. Don’t over-tighten the nut.
- (Not applicable to carbon fibre mudguards) Since the fork crown on most bikes is not perfectly tangent to the wheel, you’ll need to align the fender to the wheel. Simply hold the fender on either side of the fork crown and apply a little pressure to line it up with the wheel. This will make a little dent in the fender around the mounting screw and allows the fender to line up with the wheel.
- Replace your wheel and check the fender’s alignment.


Attaching the front fender with an L-bracket
- Attach the L-bracket to the front fender with a 5mm screw and nut. The nut goes on top so that you can access it easily with a wrench.
- Loosen the brake bolt, withdraw the brake and attach the L bracket to the FRONT of the forks if possible. You may need to bend the L bracket to achieve the correct clearance between the front of the fender and the tyre. Detach the L bracket from the mudguard blade before doing this, or you may damage the blade..
- Tighten the R-clips and fork crown attachment.
Attaching the fender stays to the fork eyelets:
R-clips are used to attach the stays to the fork eyelets. If your bike has two eyelets on each side, it“s best to attach the fenders to the rear eyelets and the rack to the front eyelets. Modern bikes have eyelets that are are threaded for 5mm screws, but some older European frames have odd-sized or unthreaded eyelets; in these cases you can find screws and nuts to fit them at the local hardware store
- Place the R-clips on the stays and screw them to the eyelets on your front dropout with 5mm screws. Place a lock washer under the head of the 5mm screw, but don“t tighten the screws yet. Removing your wheel makes this easier.
- Adjust the stays for a perfect fender gap by sliding them in the R-clips. Also check that the fender is centered over the tire. The stays are extra long and must be cut to length. Mark the stays with a felt tip marker.
- Unscrew the R-clips and cut the stays to length with a hacksaw or large wire cutter. It’s a good idea to file down the ends so they aren“t sharp.
- Tighten the R-clips and fork crown attachment.


Attaching the rear fender to the chainstay bridge:
On VO and other well-designed frames there are bosses at the brake bridge and the chainstay bridge, and there is plenty of room for the fenders. Other frames have an un-threaded hole and require a bolt and nut
- Remove the rear wheel.
- Check to see that there is sufficient room at the chainstay bridge to fit the fender. It’s common to have to flex the fenders in a little to make them fit. Mark and drill a 5mm hole where the fender touches the chainstay bridge. Attach the front of the fender to the chainstay bridge. If there is a threaded boss simply screw in a 5mm bolt. Use a leather washer between the fender and bridge and a metal washer inside the fender.
- If the chainstay bridge hole is unthreaded, attach the fender with a screw and nut. Use a leather washer between the fender and bridge and a metal washer inside the fender.
- Some frames don’t have a hole in the chainstay bridge, but fenders can still be installed with a p-clamp.

Attaching the fender at the seatstay bridge boss:
 As with the chainstay bridge, some bikes have a threaded boss under the seatstay bridge for fender attachment. Other bikes will require using a crimp-on bracket or L-bracket.
- If your frame has a threaded boss under the seatstay you“ll need to drill a hole for the attachment screw. (This hole can“t be pre-drilled at the factory since its location would vary with each frame size and model). Mark the location of the hole by holding the fender against the boss. Drill the hole with a 5mm bit.
- Attach the fender with a 5mm screw. Use a leather washer between the fender and bridge and a metal washer inside the fender.
Attaching the fender at the seatstay bridge with a bracket:

- If your bike doesn“t have fender bosses use the crimp-on bracket to attach the fender. Hold the fender against the bridge to determine the bridge“s location. Fold the arms of the bridge under the fender. Check the fender“s alignment. Crimp the bracket arms closed with pliers. You can use an L-bracket instead; see above.
- Attach the bridge to the brake bolt. If you have cantilever brakes you’ll need to use a screw and nut to attach
the crimp- on bracket to the seat stay bridge. - A few bikes don’t have a hole in the seat stay bridge. In that case you can use a p-clamp to attach the fender.


Attach the fender stays to the rear eyelets:

- Attach the stays to the dropout eyelets as you did for the front fender.
- Trim the stays to length.
- Check that all the screws, nuts, and bolts are tight.

Customer Tips
Here are some tips from customers who have fitted the mudguards:
The fork crown was the trickiest. I used sliding brackets on front as well as rear. On the front one in the photo below, I threaded zip ties under the bracket (between it and the mudguard) to locate the mudguard sideways relative to the fork, and I used two zip ties through the hole/mount at the back of the bracket to locate it vertically in relation to the fork crown. It’s ended up being very stable, with no rattling or movement even on rough roads and bridlepaths. I’m very happy.